
I imagine most people at one point or another have owned one of your basic standard black desk chairs. They are not much to look at, but they serve their purpose, which is why I have hung onto mine for...well, let's see...since I was 16? Yep, that's right. My desk chair and I go back...way back. Somewhere along the way she got a stain. Do you see it? Ha! That's a joke. Of course you do! It's gross. Eww. Anyway, I decided that I needed to give my chair a new look. I wanted to brighten her up, so that she fits in better with the decorating and color scheme of our study/guest bedroom.
So, how did my desk chair go from this....

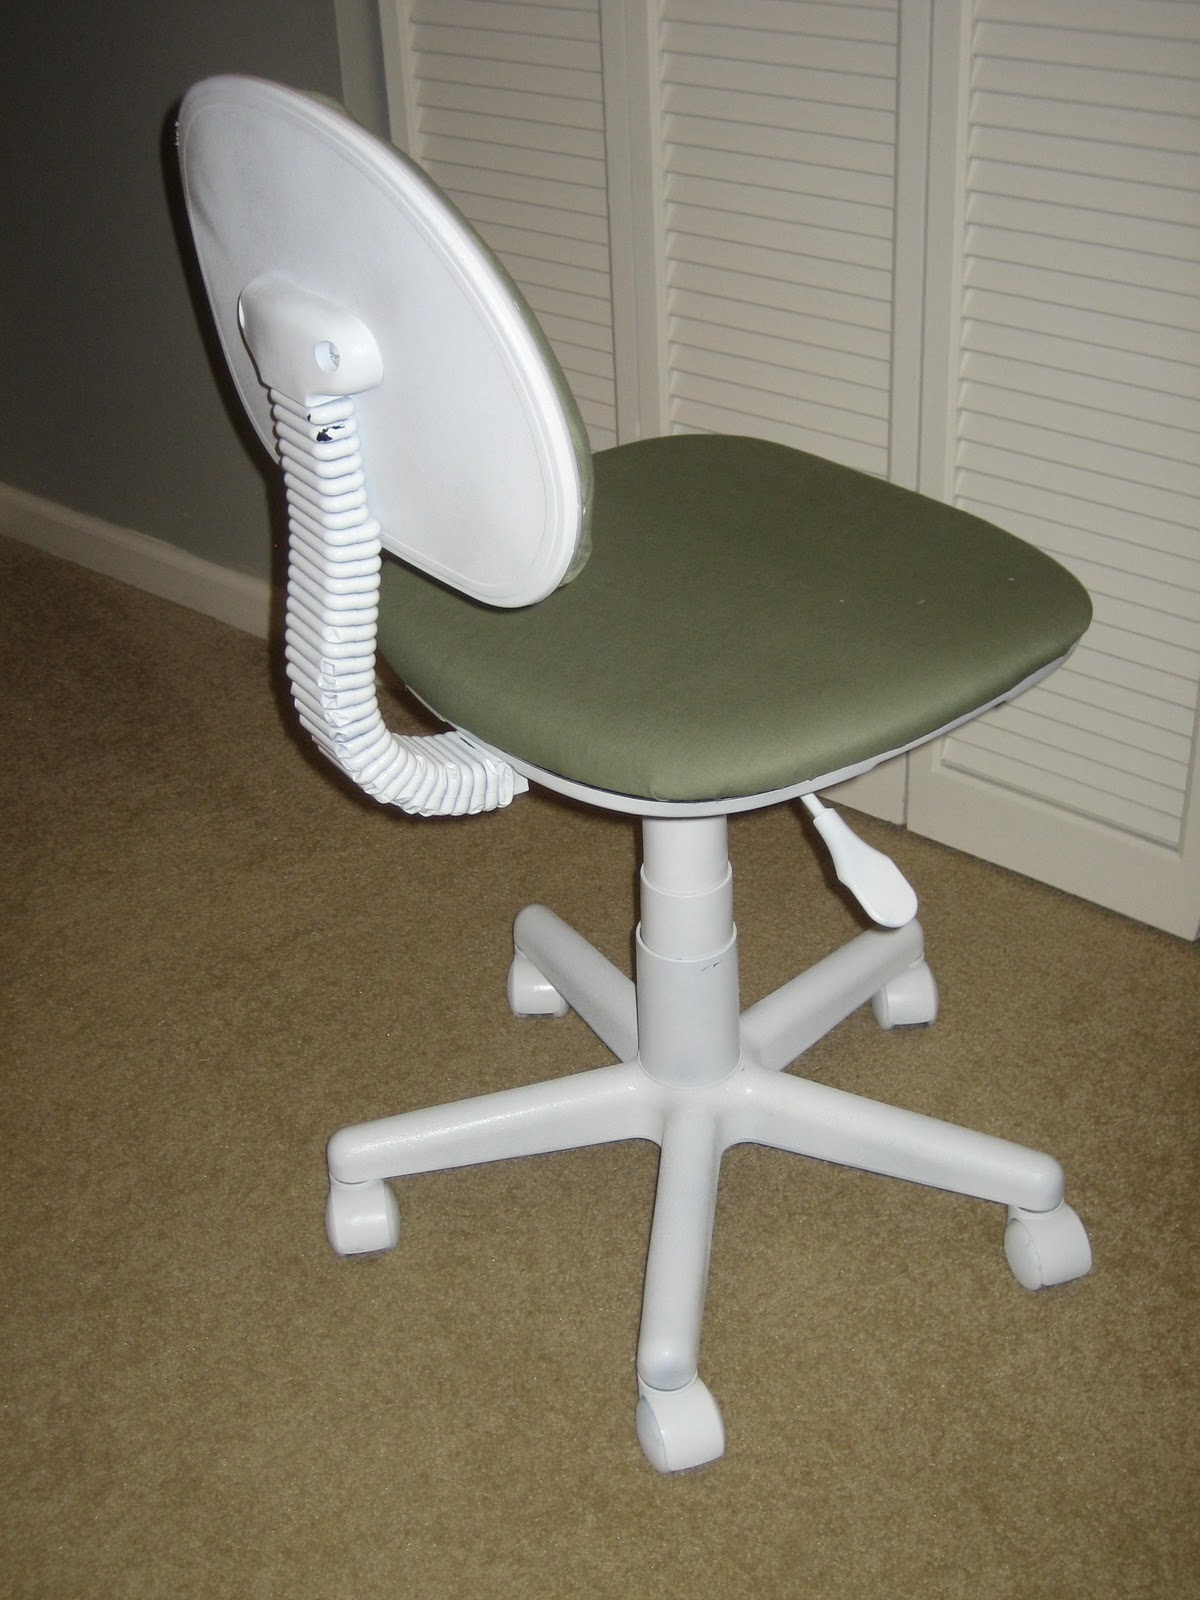
...to this?

I would be thrilled to tell you!


Materials
- Staple gun ($20) with 3/8 inch staples
- 1.5 yards of fabric or less (Mine is a cotton fabric from Walmart, which I chose mostly because it is only $2.50/yard.)
- Spray paint (optional; $5 for Krylon Fusion for plastics white)
- Screw driver (already own)
- Scissors for cutting the fabric (already own)

Time - It took about 30 minutes to take the chair a part and reupholster the fabric, but it took much longer to spray several coats of paint on the base of the chair.


First, you will need to remove the hardcover backing of the backrest, as well as the seat from the base. It is a lot easier than it looks, and putting it back together isn't a whole lot harder.

At this point, you will have the back of the chair, with the hardcover removed. Cut out some fabric of generous proportions.

Start stapling! :) Already? Yes, go ahead. Mistakes can be fixed by pulling out staples with the back of a hammer.

I don't know if maybe I was doing something wrong (this is my first time to use a staple gun), but occasionally the staple would refuse to go in all the way, so I would have to hammer in the part of the staple that was still poking out. No problem!

For clean edges, you will want to scrunch up the fabric (as shown above) when you staple.

Cut off the excess fabric after you finish stapling.
By the way, just a reminder to make sure you are not covering the holes where the screws go in with fabric. I wasn't thinking and made the mistake of stapling over those holes, and then having to remove some staples to fix the problem. Oops!
The photos below are what the backrest part should look like after you finish stapling around it.


Yay! Almost done!
Now just repeat these steps on the seat of the chair.

The petals of the flower all fell off. But I was left with this! :)

I'm pretty happy with this subtle flower impression!

I am so happy I tried this project! I was kind of nervous I would mess it up, but it was way easier than I had imagined.
I'm linking to...
By the way, just a reminder to make sure you are not covering the holes where the screws go in with fabric. I wasn't thinking and made the mistake of stapling over those holes, and then having to remove some staples to fix the problem. Oops!
The photos below are what the backrest part should look like after you finish stapling around it.


Yay! Almost done!
Now just repeat these steps on the seat of the chair.
If you only want to reupholster the seat and backrest, then you are done. Way to go! Put the chair back together and you are ready to sit and admire your fresh and beautiful desk chair.
Alternatively, you can do what I did and paint the base of the chair and the hardcover of the backrest. I am so happy I did, but that's because the black didn't fit in our color scheme. I used Krylon Fusion for Plastics spray paint in white. It has held up really well. I tend to put my bare feet or shoe-ed feet on the base of the chair as I'm sitting, but not a single scuff mark is visible! (By the way, it took a whole can of spray paint and several coats to cover every nook and cranny of this chair. But so worth it I think!
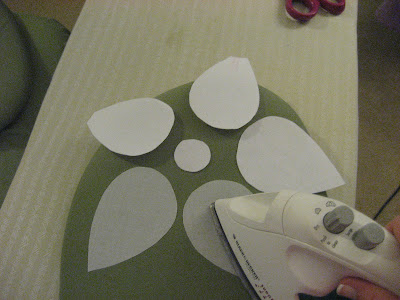
Another little thing I attempted to do is add a flower to the backrest cushion. I cut out white fabric and ironed on some Heat 'N Bond to the back, and then I tried to iron it on to my already upholstered cushion. Bad bad idea.

The petals of the flower all fell off. But I was left with this! :)

I'm pretty happy with this subtle flower impression!

I am so happy I tried this project! I was kind of nervous I would mess it up, but it was way easier than I had imagined.
I'm linking to...


Great job. Big change. I really like you painted it as well. Didn't know that whas possible on plastic. It's like you're having a complete new chair. Nice!
ReplyDeleteThis is an amazing undertaking! I am impressed with how good it looks! I love it!
ReplyDeleteI bought the knobs at Lowe's about 1 month ago! They were with all the other knobs and they were clearance! I hope you can get your hands on some!!!
Thanks for the compliments, ladies! You all are too kind.
ReplyDelete@oops! - Thanks so much for responding! I can't wait to check out Lowe's knob section. I want to go now.
You are a brave woman to paint the chair - and it paid off because it turned out great! The flower impression is awesome, even if it was an accident.
ReplyDeleteThanks for the comment on my blog! Come by anytime.
You did a great job!! Thanks for the inspiration. I got a desk chair similar to this one and now I have ideas....
ReplyDeleteGreat Job! I am in the process of re-upholstering some cahirs, but boy! the stripping part took forever! I will post as soon as I'm done
ReplyDeleteAhh...Great Job. Thanks for the motivation that I needed to finally tackle my office chair. It has arms so I wonder if I can figure that out?? I will give it a try now.
ReplyDeleteGREAT tutorial! I love the subtle flower impression too! Thanks SO much for linking up to Thrilling Thursday @ Paisley Passions.
ReplyDeleteThanks everyone! I can't wait to tackle my husband's desk chair next. It's bigger and also a completely different shape than my chair, so we will see how that goes... :)
ReplyDeletewhat a great project...waooo...nice tutorial...
ReplyDeleteThanks for sharing your idea! I did something similar to my dining room chairs but haven't considered desk chairs.
ReplyDeletewww.dontwasteyourhomemaking.com
Way to go girl! Looks great!
ReplyDeleteHolly
www.hallelujahsbyholly.blogspot.com
This post is truly inspiring. I like your post and everything you share with us is current and very informative, I want to bookmark the page so I can return here from you that you have done a fantastic job ... office cubicles in miami
ReplyDeleteWow!
ReplyDeleteSuch a useful and unique post, thanks for the share.
Law Coursework Help
reat job. Big change. I really like you painted it as well.Such a useful and unique post, thanks for the share.
ReplyDeleteWeb Development Services In Florida
Nice articles and your information valuable and good articles thank for the sharing information study chair
ReplyDeleteNice articles and your information valuable and good articles thanks for the sharing information Cafe Plastic Chairs With Arm
ReplyDelete