9.29.2010

Bathroom closet reorganized to be functional and pretty

Organization....aaahh. It's such a beautiful word when you think about it. Now put it together with "closet." Say it with me, "organized closet." Even better!

Now if I could just get my closets organized and keep them that way all of the time without exception. {Dreaming...} Well, until then, I can at least make it easier on myself to make it a habit to put away my hair products after doing my hair in the morning. If it looks nice and there is a spot for everything, then I am a lot more likely to put in the effort. Plus, with designated spots for all of my products, it's not a guessing game as to where in the heck I should put my contact solution, for instance. 

So, here is my bathroom closet before

(I have a lot of products, I know. Hehe...I like to stock up, so that I never go a day where I'm missing something.)

As you can see, the shelves are not very functional, despite the fact that the overall size of the closet is pretty good. The space making up the slats in the shelves is just big enough to let most things fall through or fall partially through, so I typically do a lot of readjusting and/or picking up off the floor and placing the object back on the shelf. As you can imagine, that didn't exactly encourage me to put my stuff back in the closet after using it, because it was a major pain to put it back. 

Anywho, to fix this problem, I ran over to Target and picked up some thick rolls of material...? Okay, that does not make any sense….haha! I just can't remember what it is called. You'll know what I'm talking about when you scroll down to the after picture. I also bought a few baskets and 2 spinning plate things.
Here are some after pics!


I already had this desk drawer organizer, but it is perfect for my hair accessories and tools. See you can put bobby pins in one of the dividers, hair rubber bands in the other, etc. 

I cannot tell you how much my reorganized closet has improved my life! It sounds silly, I know. But I honestly feel better about myself when I keep an organized closet. And it's kind of pretty too!

I actually did this project a few weeks ago, and I am happy to report that I have kept it up (for the most part, anyway!). The trick now is getting my husband to put his stuff away. Oh and you'll notice in the after picture that I only allotted him one basket, but it's not because I'm a meanie but rather because that's all he needed for his toiletries.

Also, if you are wondering how I attached the shelf liner (oh! That's the name I was trying to recall earlier), I ended up sewing it on. That's right. I sewed it to the shelf with a needle and thread. I made big long stitches across the front and the back, like so…


It didn't take very long, and it only cost around $40 in total. That's still a little rich for my blood, but I have to admit it was worth it. The biggest expense was the 2 rolls of shelf liner at $10/roll at Target. The spinning plate organization things were $6.99 a piece, but again, well worth it.  

Yay for organization!!! Yay for closets that make us happy!!!

Do you have photos of a DIY closet makeover? I would love to see them and show them off in a post! Just leave a comment or send me a message at 31diyproject[at]gmail[dot]com.

Organize and Decorate Everything

9.25.2010

One lovely blog - passing the award along!

I received a blog award yesterday! Can you believe it? Sometimes I'm not sure whether I am just writing to myself or if anyone finds my projects and tutorials worth reading about, so that is why I am so honored that Big Mamma's The Bristol Project passed this award along to me. 


Wasn't that so sweet of her? You should check out her blog. She has some great content and a great sense of humor (which makes it all the more fun to read!). She writes about recipes, weight loss, projects, and family. 

The way these blog awards work is that, once you receive one, you pass it along to other deserving bloggers, so here are my choices in no particular order:

  1. This Thrifty House is definitely one of my favorite blogs that I follow. Reading about the DIY projects Sharon completes while on a budget (as most of us are) has been truly inspirational - in fact, her blog was the one that inspired me to start my own! She has so many innovative and interesting projects with great before and after photos. If you haven't already, you should definitely check out her tutorials.

  1. Just Another Day in Paradise is another great blog. Desiree has a lot of great posts on her new projects and home décor. She has a chic decorating style that I LOVE! You should check out the beautiful photos of her home and her projects on her blog - there is no doubt they will inspire you!

  1. Thrift Store Decor Junky is another blog I have repeatedly found myself going back to. Suzanne posts about DIY projects, many of which involve thrift store furniture makeovers (and everything else in between). She has great before and after pics, too. She also hosts a link party (which I have not joined in yet, but I've been meaning to!)


 Hope everyone is having a great weekend! Thanks for stopping by!

9.22.2010

Bathroom cabinets from drab to fab! {tutorial}

My bathroom cabinets were looking a hot mess, so I decided to do something about it last weekend. Because my husband and I are still renting, it's not like I could take them in some creative new direction, so I just gave them a new coat of wood stain to give them a refreshed look. And the result you ask? They turned out more gorgeous than I could have imagined! I also looked into new hardware, but have you seen how expensive hardware can be? Ouch! Instead, I took my trusty old spray paint and painted those cabinet pulls, and you know what? I love them now! 


By the way, these pictures really don't do these cabinets justice. It totally transformed the look of the space.

Here is what my cabinets looked like before: 


{Shutter}


Materials

  • Stain (approx. $12) This will last you forever. The amount of liquid in the can went down by maybe a centimeter by the time I was finished with it.
  • Flat-edge paintbrush ($5)
  • Dropcloth ($1) or cardboard boxes flattened.
  • Acrylic paint and brush ($2) (optional - for damaged wood)
  • Sanding tool ($3.74) (optional - are you gonna be a square and play by the rules or do it the fun way? Just kidding.)


Time - approximately 2 - 2.5 hrs 


9.16.2010

Slipcover inspiration!

Sofa slipcover from Beck's Chic Life

I am so inspired by this slipcover that Rebecca at Beck's Chic Life made. She is a self-proclaimed elementary sewer (yeah right!), which is what sort of gives me hope that I can make a slipcover for my sofa and loveseat. I have had some trouble with my little sewing machine lately {tear, sniff, sniff}, so do you think I could stitch witchery a sofa slipcover? Wait, that's stupid, right? Yeah, I guess it is. Ha ha...I was just kidding...(not).

Here is a before and after of her slipcover. I am so impressed that this is the first slipcover she has made.

Before:

After shot of the back:


You can see more photos on her blog: Beck's Chic Life

9.15.2010

Tutorial: Light and breezy no-sew curtains

I can't believe I waited so long to make these curtains for our office/guest bedroom. It was unbelievably easy. It was also a relatively inexpensive project. I spent a total of around $15 to make 2 sets of curtains - that is $7.50 per window treatment! Yay! (It makes me smile just thinking about it.) Plus, when you go with handmade curtains, you can make them fit the exact dimensions of your window.


Materials
○ The amount of fabric will depend on your window, but I used 4 yards of fabric (I bought two precut 2-yard packs of white muslin fabric from Walmart for $5 a pack.)
No-sew iron-on tape - stitch witchery or something like that ($2.79)
Scissors (already own)
Iron and ironing board (already own)

Time - approx. 1.5 hrs

So this project is pretty straightforward, but I figure it never hurts to show someone exactly how I made mine, in case it makes the process easier in anyway.


Step 1 - Measure your windows to see how long and wide you want your panels. Remember to leave enough extra fabric for finishing off the edges, so add an extra 1 to 1.5 inches to the width and an extra 6 to 7 inches to the length.

Step 2 - Then, cut the fabric to those dimensions.


Step 3 - Fold over a section on the top that is around 4 or 5 inches. Place the stitch witchery or other no-sew tape underneath the fold, leaving a gap for your curtain rod, and press it with your iron set at a high level.

Step 4 - Finish off your sides the same way with the no-sew tape, but make the fold as small as possible.

That's it! Oh, and P.S. I got the rods for around $9 at Target. Suh-weet!

Here are some more shots of my curtains. They're not perfect, but it sure beats not having any window coverings at all. (You'll notice that we do not have miniblinds or anything - well, we did, but I couldn't stand them any longer and tore them off. Hehe.)


I'm thinking about adding some decorative details around the bottom or the sides of the curtains, but I'm not 100% sure that is a good idea. Any thoughts? Thanks so much!


I'm linking to these lovely parties:


9.10.2010

Tutorial: How to recover a lampshade with fabric

Hi everyone! I am so so so in love with my re-covered lampshade.  Just thought I would share how I recovered mine.

First of all, it was unbelievably easy. I wish I would have done this to my desk lamp a year ago when I first bought it. Maybe then my desk wouldn't seem so daunting. (You see, I have come to associate it with oodles of negative things, such as mind-numbing migraines from getting stuck on writing that darn thesis proposal and also bloodshot watery eyes from straining to read boring journal articles into the wee hours of the night…oh boy, that's fun {rolling eyes}.) Perhaps I would have saved myself some wasted procrastination hours if I would have made my desk more inviting earlier on. I mean, how can a cute flowery little desk lamp be associated with anything other than happy, lovely, wonderfulness?

Anyway, maybe you too have a lampshade you would like to revamp. If you have scissors, Mod Podge, a foam brush, and lightweight fabric on hand, then you could get to work and have this project complete in no more than 20 minutes. (This is the perfect project for people like me who need instant gratification.)

By the way, the materials I used were all leftovers from other projects, so I guess I can say this project was free…?  Or maybe that is stretching it a bit.


Step 1 - Roll your lampshade along the piece of fabric tracing the outline of the shade as you go. I recommend tracing it onto paper first. 

I added about 3/4 of an inch (although that was too much) to both sides of the shade outline. This will give you some room for error as well as extra fabric to tuck under the edge of the shade, so that you have a nice finished edge when it's all said and done.  Cut out the shape next.


Step 2 - Apply mod podge to the lampshade with your foam brush.


Step 3 - Line up the fabric to the shade, and press down gently. Smooth out any wrinkles. 

Note: I worked in sections of about 3 inches wide at a time.


Step 4 - Repeat steps 2 and 3 until you have your entire shade covered.


Step 5 - You will have excess fabric hanging off the bottom and top of the shade. Using your scissors, trim it down as close as possible while still leaving enough leftover so that you can tuck the fabric into the inside of the shade.


Step 6 - I ended up just dipping my fingers into the mod podge and pressing the excess fabric into the inside of the shade. Use as much as needed to get the edges to tuck under completely without any sticking up.

And you're done! Congrats on your fabulous new lampshade!

Here's a before and after of mine.

Before

After


I'm linking to...

A Little Knick Knack


New Friend Fridays


9.06.2010

Tutorial: Planner makeover for back-to-school

It's that time of year again: back-to-school time. My semester actually started back a few weeks ago, so it was about time that I figure out a way to beautify my boring weekly planner. It was seriously lacking color and personality.

Here is an after shot of my planner. Now, I actually want to plan ahead!


Materials
  • 2 sheets of cute 12 x 12 scrapbook paper (Lightweight fabric would probably work too.) {< $1}
  • Planner / agenda that you already own and want to recover (I got mine from my university's bookstore, because it lists university dates, like Fall Break, and comes with stickers - yes!)
  • Mod Podge (You could probably substitute regular Elmer's glue, but you will need to give it more time to dry.) {Large bottle of Mod Podge is $5.97 - this project will only take a tiny amount.}
  • Foam brush to apply the Mod Podge {< $1}
  • Scissors {already own}
  • Ribbon or yarn (optional) {< $1}
  • Letter cutouts or stickers (optional) {< $1}

Time - approximately 30 minutes

(Check out the cool stickers that came with my planner! I'm sort of embarrassed to admit that those stickers were the main reason why I went with the university planner. Ha ha!) 

Step 1 - Trace an outline of your cover onto your sheet of scrapbook paper, and cut the shape out. 


Step 2 - Apply a thin layer of Mod Podge to the cover of the planner. Then, place your paper on top and gently smooth all of it down. 


Step 3 - Trim the excess around the edges.


 Step 4 - Repeat steps 1, 2, and 3 on the inside of the front and back covers, as well as on the outside of the back cover.

Note: I used different patterned paper for the inside of the cover. It makes it cuter that way, I think. 


To finish it off, I just tied a piece of coordinating yarn around the planner and tied a bow. I also mod podged on some letter cutouts to form the word "planner" at the top…just in case anyone doesn't know what it is…ha ha.

Happy back-to-school planning!

By the way, check out the CSI Project. It's back-to-school week, so I'm linking up!  :) 

Visit thecsiproject.com

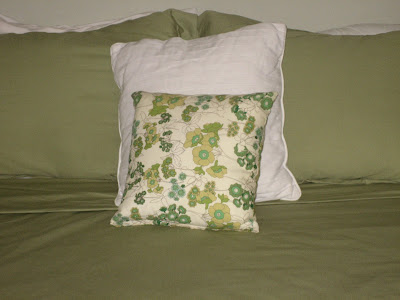
New pillow!

I made a simple little pillow for the guest bedroom, and just thought I would share. 

It's amazing how much interest it adds to a room when you incorporate a little bit of fabric print. I'm loving this green flowery and retro-ish fabric I got from Joann's. I found it on the clearance rack, by the way -- even better!

I was busy, busy this past weekend working on tons of projects, and I ended up using this fabric quite a bit. I'll post pictures and tutorials soon! Thanks so much for reading!

9.03.2010

New blog header!!!

I am all smiles right now! And it is all thanks to a great tutorial over at Simply Amusing Designs. This tutorial makes it so easy to understand. In fact, I cannot believe I didn't make one before. All you do is basically create a JPEG image, with a resolution of 700 x 250 pixels. Then, in draft.blogger.com, go to Design, then Edit Header, upload your image, and you're done! By the way, it's possible to make your own little graphics, like I did with my bird and flowers, with the free editing software Gimp. It does take some time, but it's really fun once you figure out all of the cool things you can do.


Anyway, you all probably already know how to do this, but just thought I'd share that tutorial I used in case any new bloggers stumble onto this post.

Also, if anyone has any suggestions or wants to give me any feedback on my header (I'm not afraid of a little criticism), I would really appreciate it. 

Thanks so much!!!

9.01.2010

Tutorial: An easy, no-sew window treatment made of placemats

A couple of months ago, I bought some placemats for my small round kitchen table, but after placing them on the table, they just didn't look right - took up too much space, I think.  But it's okay because, for better or worse, we rarely eat in the kitchen anyway. I obviously didn't want to let these go to waste, so that's how they came to be part of project #14 on my DIY list.

Here is the final product! 

(Please ignore the nasty miniblinds and dated cabinets. :) I'm a renter.

This window treatment may not seem like a big deal, but consider what I was working with in this before pic:


I think the window treatment makes a big difference, but eh, I'm biased.

Anyway, if you'd like to make some quick and easy placemat valances too, then just follow these steps. Thanks for looking!


Materials
  • 2 inexpensive standard-sized placemats in a solid color or a print would look especially nice! (Mine were from Walmart and cost around $2/placemat…I think. I don't think I would have paid more than $3.)
  • No-sew iron-on tape - the kind I have is strong enough to hem jeans or another heavy material like that ($2.79)
  • Scissors (already own)
  • Iron and ironing board (already own)

Time - 10 minutes or less - by far, one of the easiest projects I have ever done.


Step 1 - Cut out your first piece of no-sew tape, and place it approximately 3.5 inches from the top.

Step 2 - Fold the top section over the no-sew tape, and iron well, with heat at the highest setting. Keep ironing until the fabric holds strongly together. Repeat this step on the second placemat.

I thought I was done here.

But then I hung up the curtains…


Eek! Disaster! Project #14 is dead, gone, done with.

Momentary thought to self: Maybe I can casually delete this project and quietly replace it with another one. No one will ever have to know about this, my dear placemats.  We'll keep this between you and me, kay? I'm going to put you out of your ugly little misery. {In sing-song voice} Into the trash you go! 

Then, I snapped out of it and decided it wouldn't hurt to try playing around with them a bit.

In the meantime, those lucky fur babies of mine got some delicious natural PB in a chew toy. 


Step 3 - Next, I cut out two more pieces of iron-on tape. I folded the bottom of the placemat up and over toward me and toward the top. Make another fold, with the iron-on tape in between, and apply heat.

Maybe this project is salvageable after all.  :) 


Step 4 -  Place your last piece of iron-on tape under the fold you just made - so it will be between the main fabric of the placemat and the fold.

Note: All folds and no-sew tape will be on the front side of your valance.

Slip your curtain rod into the top slit, and there you have it! 

Here is a closer shot: 


Thanks so much for checking out my project! I would love to see yours!